Post-production
Build the crawl
Turn the names in your Data tab into end credits on screen: generate the scenes, cards and scroll in guild order, then reorder, move and hide names in the Composition.
The video loads from YouTube when you press play. Watch it on YouTube.
In EndCreditsPro the names and the layout are kept apart. The Data tab holds every credit; the Composition decides where each one appears on screen. You don’t lay out the crawl by hand: you generate it from the list you already have, then adjust it.
Before you start
- You need to be an admin or editor on the project to generate or change the composition.
- Your credits should already be in the Data tab, grouped by department. See Import your crew lists or Let the departments fill it in.
- While the credits are locked by an approval workflow, the composition can’t be generated or edited.
Steps
1. Generate the composition
- Open the Data tab.
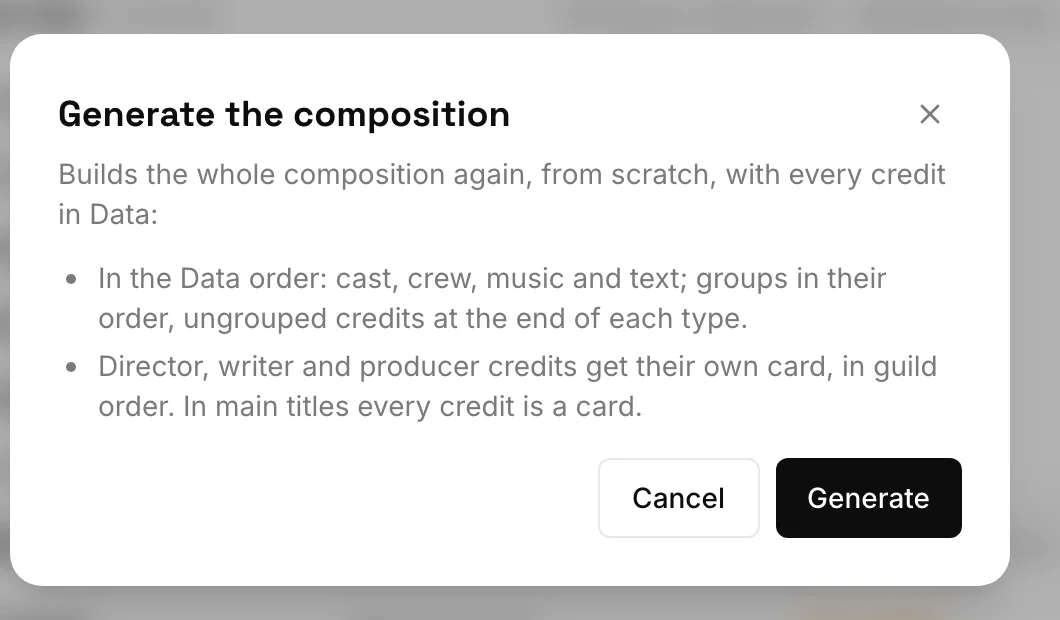
- Click Generate composition in the toolbar.
- Read the rules in the Generate the composition dialog and click Generate.
EndCreditsPro builds the whole sequence from every credit in Data:
- In the Data order: cast, then crew, music and text. Within each, the groups in their order, and the credits that are in no group at the end.
- Guild key credits first. The director, writer and producer credits each get their own card, in that order, before everything else. For end credits that means the director’s card opens the sequence, followed by the writers’ card.
- Everything else rolls in one crawl, with one block per group (department). Lists of six names or more are laid out in columns.
- Main titles work the other way round: every credit becomes its own card, and the director’s comes last, just before the picture.
The key cards are found by the exact text of the credit line, such as “Director”, “Directed by”, “Written by”, “Screenplay by” or “Producer”. Lines like “Director of Photography” or “Executive Producer” stay in the crawl with their department.
2. Start, or start again
Generating replaces the whole composition you have, images included, along with any styles set on single lines, hidden names and scene or block design. Use it to start, or to start again after big changes in Data.
Nothing is lost: a version called Before generating is saved in the History tab first, so you can restore the previous composition. See History and versions.
3. Read the composition
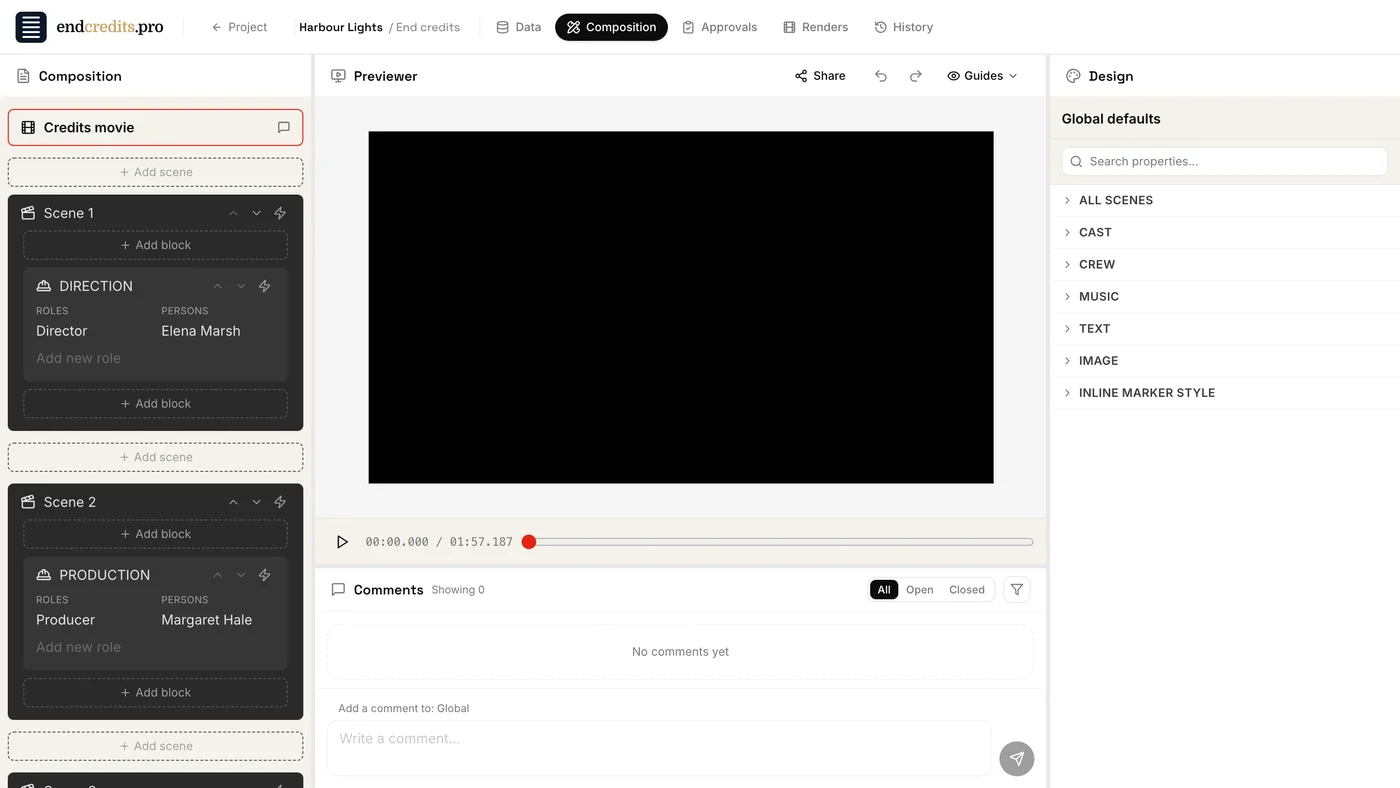
Open the Composition tab. It has three parts:
- On the left, the Composition panel: Credits movie at the top, then your scenes in order (Scene 1, Scene 2…), and inside each scene its blocks.
- In the middle, the Previewer. Press play to run the credits as they will look, or drag along the timeline.
- On the right, the Design panel, with the settings of whatever you select.
A scene is either a card, which holds on screen for a set time, or a scroll, which rolls. A block holds the credits of one kind (cast, crew, music, text or images), usually one department. Each line in a block is a credit: the role on the left, the names on the right.
4. Reorder, move and hide
Then fine-tune it in the Composition panel:
- Reorder a line. Drag it by its grip (“Drag to reorder or move to another block”), or press Alt + ↑ / ↓. You can drop it into another block of the same kind: a crew line into another crew block.
- Reorder names. Drag a name by its grip (“Drag to reorder”) within its line, or use Alt + ↑ / ↓.
- Hide a name in one place. Click the eye next to it (“Hide name in this block”). The name stays in the Composition, crossed out, but it no longer appears in the preview, the render or the export. Click the eye again (“Show name in this block”) to bring it back.
- Take a line out. The × (“Remove from composition”) un-places the line. The credit itself stays in the Data tab.
- Move scenes and blocks with the arrows on their header (Move scene up, Move block down…), or add new ones with Add scene and Add block.
To change how fast the crawl rolls, select its scene: generated scrolls use Scroll mode: Speed, 60 px/s, so their length follows from the number of names. See Cards, scrolls and timing.
5. Place what isn’t shown yet
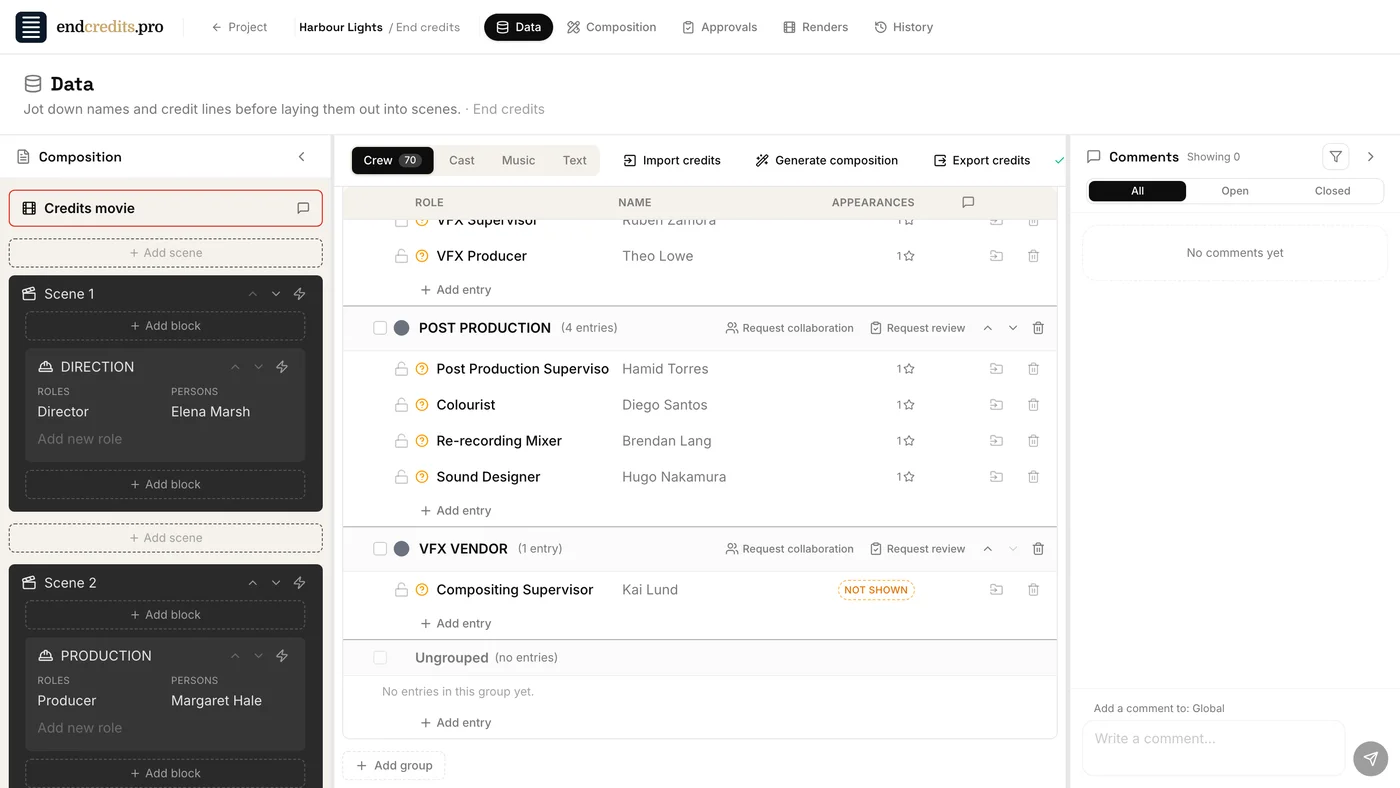
A credit you add to the Data tab after generating isn’t on screen yet. In the Data tab, its Appearances column shows a Not shown badge: “This credit isn’t placed anywhere, so it won’t appear in the final credits.”
To place it, drag it by its grip (“Drag to place in the composition”) onto the Composition panel on the left of the Data tab:
- drop it on a block of the same kind, at the exact spot between two lines;
- or drop it on an Add block slot to start a new block there.
Select several credits with their checkboxes and drag one of them to place them all at once.
Related pages
- Key concepts Data, Composition and Design: every name lives in one place, through the whole lifecycle.
- Global styles and fonts Set the role and name styles once for every scene, with Google Fonts or your own.
- Cards, scrolls and timing Card duration, and three ways to time a scroll: duration, time in view, speed.
- Import your crew lists Bring an Excel, CSV or Word file, or paste text: names are sorted by department.
- History and versions Every version kept: compare, restore, see who did what, and when.
Try it on your own production
EndCreditsPro is free during the beta. Credits from day one.
Last updated October 22, 2026.